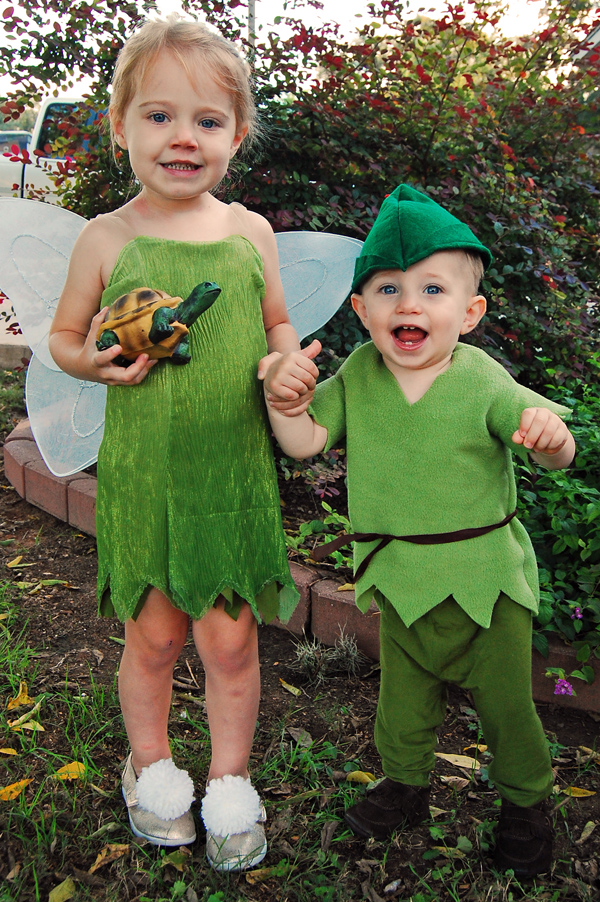
This year I made the costumes for my three kids for Halloween. To get a closer look at each one, let’s start from youngest to oldest.
That means that first up is Peter Pan.


Amazingly, the only thing I bought for his costume were the shoes which I had been eyeing anyway and it just gave me the excuse I needed to buy them. All the other materials were already on hand from other projects. I love it when that happens! It makes you feel okay about having a large stash of supplies.
Here are the pieces to his outfit.
I used this tutorial for my inspiration. We also have a golden book of Disney’s Peter Pan so I looked at pictures in that as well.

For the shirt and pants I used a pair of his pajamas to make sure they were generally the right size. This worked really well for the pants, although they did come out a little more baggy than I had planned. But otherwise they fit him well and seemed to be very comfortable and easy to wear. To figure out the shape and sizing I turned his pajama pants inside out and laid them on top of the knit fabric which I had folded in half vertically so that I could make only two pattern pieces instead of four. You can see an example of this here. This saved some time with sewing and cutting and was very easy to do. I had never sewn pants before but was very pleased with them. After cutting out the two sides you sew the inseam of the legs, then the crotch parts together, and then hem the legs and waist. Make sure to leave a part unsewn on the waist to insert the elastic. You can see it done here. This time I didn’t worry about making my seams pretty on the inside since this was just for a costume and knit fabric doesn’t fray. I sewed these pants at around 3 pm on Halloween day so I didn’t have time to worry about them being perfect.
The shirt also fit him well once it was on, but I should have used a bigger shirt as the template because it was a pain to get on and off and was a little snug. Also, when the shirt is off, the sleeves look a little funny with the angle where they are connected but when on him you can’t tell at all. I was kind of winging it. In the past I have been more careful to trace some sleeves that were inside out to get the exact shape needed and they turned out great. I was also looking at this post which gave me the idea to sew sleeves on instead of just making a shirt from one piece of fabric like seen in the first inspiration post.
The shirt was made from the same green fleece I used last year to make Yoda. And the knit for the pants were left over from making the bottom layer of Tinkerbell’s dress. I also had extra elastic on hand which was used for the waistband.

Here are some close ups of the hat and feather. I measured his head and looked at the shape from this tutorial. You can see from the picture below that the feather is made from red felt cut in the shape of a feather and then hot glued to a skewer. I used a red sharpie to color the skewer so it wouldn’t stand out. The picture is also accentuating the glue, in real life it isn’t that easy to see.
I cut a small slit under the bill of the hat to slide the bottom of the feather into and then glued the lower portion of the feather to the hat for stability. You’ll notice in some of the pictures that I sewed around the brim to make it stay up. I had tried to do it like it was done in the tutorial but it kept flopping down. He was also pretty happy to wear it most of the time so I didn’t bother with elastic to go under his chin.

Like I said earlier, the shoes are the only part that were store bought. They are from Target and are super cute. I wish they had had the largest size so that he could wear them a lot longer but we’ll get as much use out of them as we can before his little feet get too big.


It was fun making his costume and I was so happy when it actually fit him on the first try. He was so cute with his sister although a lot of people asked if he was Robin Hood…so I guess you could make the same costume for that if you wanted. Oh yeah, almost forgot, at the last minute I remembered he needed a belt and I had seen a brown ribbon in my stash earlier so I grabbed that and just tied it around his waste. I had also intended on making him some sort of knife but I was so distracted by making the other costumes that I totally forgot. Josiah had been given a short light up sword while in the hospital so I let him hold that.

Next up will be Tinkerbell. If you have any questions about how I made the Peter Pan costume please feel free to ask. Or if you have made your own I’d love to see it! Please share the link in the comments.

Reblogged this on Free Baby Shower Invitations.
Hi, thanks for the inspiration, I’ve been thinking about DIY-ing my kids costumes this year and I’ve been looking for characters they can go together as, this is too cute 🙂 Thanks for sharing!
Great, hope it helps! It was a lot of fun making those costumes.
Pingback: Déguisement Halloween enfant – 30 idées cool pour une fête inoubliable